Sunday, March 24, 2013

Hams aren't just for eating- tailoring #9

Hello Internet world!

I'm really hungry for some ham. I love ham! Especially the glazed kind at Christmas, mmm! Well if you are now craving ham because I just said it, good! Because today we are talking about hams. Sorry, you can't eat these though. That might taste really gross. Have you ever heard of a ham for sewing? Don't worry, I hadn't either before I came to Baylor. My teacher said, "and now go to the iron and press this over a ham". I immediately thought:


I was extremely confused. Now why would I want to put fabric over this delicious meat and press it??? I was so silly back then. She meant a tailor's ham! Also called a pressing ham. And it's made of fabric and sawdust, not meat :) My parents thought the same thing when I told them I bought some hams at Joann's. "Do they sell food at Joann's now??" Oh, parents :) A pressing ham looks like this:

And as you probably guessed by the name, you use it to press things. Usually you put these under a fabric that needs rounding, in order to create space for the body underneath. Such as, but not limited to, a bust dart, sleeves, shoulders, etc. The ones that are actually ham shaped, like the one above, are usually used for bust darts. It gives the fabric a gentle curve. Here are some more hams that are used for different things:


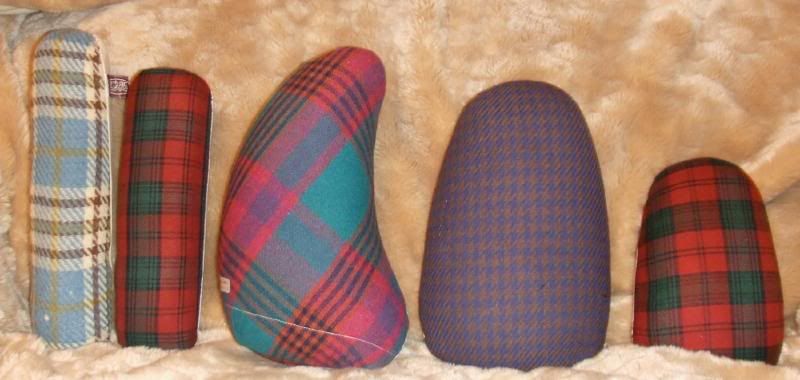
The two on the left are called sleeve rolls, or seam rolls. I've heard it both ways. You use those in sleeves or pant legs in order to get the seams to lie flat. You would just put the ham underneath the fabric and then make sure the seams are flat, and then press. The curved ham is for more hard to reach places, or if you need a steeper curve. And the two on the right are normal hams. Here are some more gadgets used in pressing:
This is a sleeve board. It looks like a tiny ironing board, because it is. It's used when you have something small and awkward, like a sleeve, or maybe a baby's outfit, and can't fit it anywhere else; this is what you would use. 


This is a clapper. Sounds weird, but it's pretty useful. Used to reduce fullness and bulk, usually with heavier fabrics. You press whatever you're doing, get the fabric warm, and then smack it with this! Good way to get aggression out :) Or you can just put pressure on it. It flattens puckering seams, and gives you a good, hard crease when you need it.


This is a collar board. The pointed end is used when you have to get down into the corner of a collar or a cuff, and gives you a stable surface to press on. This also gives you sharp edges and creases in collars, cuffs, and other small areas. 


And here are the iron and the ironing board, these are of course, a must when pressing anything :) Hope you found this helpful!

Vivre la mode, tout le monde!


Monday, March 18, 2013

Thread tracing- tailoring #8

Hey y'all!

Why are some jackets, or any clothing item really, more expensive than others? Obviously they can be made of better material. But why do the more expensive ones seem to always fit a little better than those in a lower end store? Because, the sewers take their time to mark every seam allowance and every tiny little detail BEFORE they start sewing anything. But when working with really nice fabric, sometimes traditional marking techniques of the wash-away pen or the tailor's chalk don't work- sometimes they even leave a stain! Bad! So some really smart person invented something called thread tracing. It is a perfect way of keeping everything exact. All tailored garments use this technique because it works so well. You can easily see where everything goes, and some even have fitting lines marked in case they have to take something in. We had to do this to our jacket in class. And it looks like this:


Thread tracing is exactly what it sounds like it is. You're taking really big, loose stitches (also called basting stitches) on the outside of everything. This is how you do it. You take a needle and thread, knot one end of the thread and leave the other a little shorter than the knotted end. Exactly where your seam allowance is, or whatever you're marking, take big basting stitches all the way around. Be sure your thread is only one thickness, not two. And although this does take a bit of time, it is so worth it because you have everything exactly marked and don't have to worry about where things go, or if your seams are straight. If you mark them straight, then that's the way they should turn out. 


See, all they're doing is taking simple, big stitches all the way around whatever piece they are working on. Who knew something so simple could make such a world of difference! It's amazing, really.

Thanks for reading, fashion enthusiasts!
Vivre la mode, tout le monde!

Sunday, March 17, 2013

So many colors, so little time- Illustration #8

Hello, hello, hello fashion and art enthusiasts!

Strap on your seat belts, because we're gonna be talking about color! I'm not sure how much art experience everyone has had out there, so I'll just start from the very very beginning, because we covered it in class. I also feel compelled to share some of my little tricks for remembering them.

You have your basic color wheel, and everything is separated into 3 kinds of colors:

  • Primary- pure color (not mixed with anything)
  • Secondary- mix the primaries together
  • Tertiary- mix the secondaries and primaries together

Color wheel

According to my art class papers, the color wheel was designed by Johannes Itten and there were some others designed by Munsell and Ostwald. I don't know who they are, but they certainly were cool for designing the color wheel!

There are a few other color schemes that I'm going to talk to you about. I actually like talking about color schemes (even though the names can be hard to spell and sometimes they can be confusing). I must be really weird lol. It's all because I like to see which colors can work together and why. It's just something interesting to me. So even though there's a fair few, and the names are weird, I promise once you get it, it sticks with you. And the colors all look really awesome together, so they can't be all bad, right? Right. Let's go. A quick list of the names to get your feet wet:

  • Analogous
  • Monochromatic
  • Complimentary
  • Split complimentary
  • Neutral
  • Triadic

For reference throughout this post:
*tints and shades.
  • Tints are hues with white added- resulting in a mix above the hue's normal value
  • Shades are hues with black added- resulting in a mix below the normal value of the hue.
**values and intensities
  • Value is the lightness or darkness of a hue
  • Intensity is the brightness or dullness of a hue
And now I'm going to talk a little about each one, and hopefully the pictures will help. First, Analogous. This utilizes colors which are closely related in hue- located adjacent to each other on the color wheel. For example: yellow, yellow-orange, orange, and red, plus *tints and shades of each. A way to remember is "analogous" is "next to" colors on the wheel. Both have N's in them. Or you can think of it as "analogous" is "adjacent" to the colors, both starting with A's.


Analogous color scheme

Analogous in fashion
Next is monochromatic. It consists of one hue and its various values. For example: blue, plus *tints and shades. "Mono" means one; pretty self explanatory.

Monochromatic in fashion
Complimentary is next. It features two hues located directly across from each other on the color wheel. For example: green and red, plus their various **values and intensities. You can remember it like this, "You compliment the person across from you". That's how I learned it back in the day when I first learned color schemes :)

complementary
Complementary in fashion
Now it's Split Complimentary's turn. That is the one that utilizes one hue plus the hues on either side of its complement on the color wheel. For example: green, red-orange, and red-violet, plus their various **values and intensities. So it skips over that one in the middle. In my example, it's skipping over red, which in in between red-orange and red-violet. Just remember "Skip to Split". Don't judge my silly sayings.


Split complementary in fashion
Neutrals are up next. Neutrals are colors which have been reduced in intensity, or neutralized, by the addition of its complement, white black or gray. Warm neutrals, as you can see, have the warmer tones added to them and then they cool colors are below those with the darker colors. Neutrals are very popular for fall, but I know y'all already knew that :)

neutrals
Neutrals in fashion
And we've saved Triadic for last. This consists of three hues which are equally spaced on the color wheel. For example: green, orange and violet, plus their various **values and intensities. See how these kind of look like peace sign? I remember this one like this "Hippies like T Harmonies", to get me to think that hippies use peace signs, which leads my brain to the peace sign on the color wheel, to lead me to the evenly spaced colors. Again, don't judge me for these weird sayings. You'll be 80 years old and still saying them because they stuck with you. You'll thank me someday :)

Triadic in fashion
So that's all I have on basic color schemes and such! Hope this was helpful!

Vivre la mode, tout le monde!


Monday, March 11, 2013

Dirndls: funny name, serious garment- illustration #7

Howdy!

So I know this is really random, but I really like that sandwich restaurant Schlotzky's. They have such good food! Yummy! Anyway, I feel like an advertisement for Schlotzky's because their slogan is "Funny Name. Serious Sandwich", and my title is Funny Name, Serious Garment. Because today I am going to talk to you about a new word that I learned just recently, and it turns out to be the name of a garment.... Dirndl!!!! Yes, that is the name of it. Sounds like "surprise" in German or something lol. It's a really weird word, I know. I was really intimidated by it too. I was like "what is this crazy word??" Its pronounced [durn-dull] and it is simply a gathered skirt. WHOA! So this means that most American women have worn a dirndl at least once in their life, probably without knowing it?? Probably. I certainly didn't know that's what it was called. Now I feel more informed!

Anyway, Dirndl's are very important to society because they are simple to make, simple to draw, and they look good on most body shapes. You can make them fancy with nice material, or you can make them simple with some cotton and an elastic waistband.They also vary in length. So many options! The cool thing is, you can wear them with many things and through many different seasons, depending on the material and the length of course.

Here is a link to a trend report from 2012 on a cool fashion website which talks about dirndls! They were popular in the 50's and they made a comeback in 2012. Pretty cool, eh? I'll include some more pictures now :)

Like I said, you can go fancy like this Taffeta skirt

Or just a simple cotton checkered. So cute and retro!

This is from Forever 21 lol
This one is long but classic
I hope this has opened your eyes to the world of possibilities with Dirndls! See, it's not such a scary word after all :) Hope you enjoyed :)

Vivre la mode, tout le monde!

Sunday, March 10, 2013

Shoulder pads are still popular?!- tailoring #7

Hey hey hey my fabulous readers!

I think I am up to 4 followers now? Yeahhh! :) I'm so glad people are actually reading what I post and I'm not writing to empty space lol. So since y'all continue to support me, I'm gonna keep on posting about things :) So, in tailoring, we are continuing to work on our jackets. I forgot to tell y'all that we are making our own shoulder pads for our jacket. "Whaaaaaaat????? Logan, is this the 80's???? Why are you making shoulder pads???", you may be thinking. Let me assuage your fears, my friend! All tailored jackets have them silly :) Because most of the time tailored jackets have a set-in sleeves, you need that structure so the sleeves stand upright. You don't want them falling in like a soufflé, do you? No :) So in class, we made our own shoulder pads out of Pel-On, this brand of stiff interfacing, and some thick felt. They look something like this, only ours have an extra section that extends off the front in order to give the front of the jacket some more structure. Sometimes women have a dip between where the shoulder is to where the chest/ rib cage begin, right on the front part of the shoulder socket. I hope that description makes sense... I'm not in any medical terminology classes lol. Anyway, we need that extra part of interfacing to smooth out that dip, so that the lapel on our jacket lies flat. 


What's inside a shoulder pad


Okay, these 80's shoulder pads might be a little frightening. But I'm going to prove to you, shoulder pads aren't scary!
Nice!

I love a good motocross jacket 
See how nice those look? Hey, fun fact, the more you define your shoulders, the smaller your waist will look. Having the shoulders look longer makes the waist appear smaller in comparison, because you're drawing the eye up and outwards.  Here's a normal looking jacket with shoulder pads.

This pink jacket is so pretty :) I want it. The shoulder pads give just the right amount of structure and definition without going crazy. 


Even back in the 40's (ish) era, they had shoulder pads. Still looks great, even back then.


And the shoulder pads just add to this lady's completely awesome vibe. She looks like she could take over the world or something. Broader shoulders evoke confidence too... Just look at her! She looks powerful!

I love this so much
FUR

So I hope this helps you get over your fear of shoulder pads. They really are necessary! Now, some people do take them a little far. But hey, to some people that's a great thing. To others, it's insane. That's the thing about fashion. Everyone has their own point of view and the styles and trends change lightning fast. To quote Heidi Klum, "one day you're in, and the next day you're out".

Vivre la mode, tout le monde!

Thursday, March 7, 2013

So, what is a Dolman sleeve anyway?- Fashion Illustration #6

Bonjour tout le monde!

Aujourd'hui, je te parle a sujet de... Whoops! Sometimes I forget to switch my brain back to English after I have done my French homework lol. So today I am going to talk to you about a very important kind of sleeve- The Dolman. We talked about it in class when we discussed all kinds of sleeves. A Dolman sleeve is a sleeve set into a very low armscye; in fact, the armscye may extend to the waistline, in which case there will be no underarm seam in the top. It kind of almost gives you a batwing effect. I found this on the internet that I didn't know about Dolman's. "Dolman sleeves were very popular in ladies clothing during the Civil War. They had the effect of making the shoulders look sloped therefore minimizing the appearance of the waist." Wow, that makes total sense! You really can't tell where their waistlines are in these pictures. Look!

These are such cool sleeves! I love the fact that there is no underarm sleeve, so the amount of fullness can vary from a little to a lot depending on what you want.  I'm sure they would be flattering on most body types too. I think I have some shirts like this in my closet... somewhere lol. I feel like adding some more pictures!
Yay! That's all for me for now, bon nuit! (goodnight)

Vivre la mode, tout le monde!

Tuesday, March 5, 2013

What we're doing now!- Tailoring #6

Hey fashion readers!!!!

I'm very excited... because this post will be the first time I was able to figure out how to take pictures from my phone and upload them into a blog post! Yay me! So I wanted to give you a peek into my life as a college student. This is what we are doing at this EXACT MOMENT. We are making a tailored jacket... Woo! I'm going to show you some of the things we do to create our projects.

So, first things first, the first picture is the tool that I use to create my garments: my sewing machine. His name is Sam the sewing machine. He can sometimes be moody and annoying (like most boys; sorry male readers but it's true), but he's loyal and has stuck by me through many projects.


These pictures are of me making my jacket muslin- or a practice jacket. "Muslin" in the kind of lightweight fabric we use to practice on. First, we get the pattern piece to whatever project we are doing. It tells us the shape of the fabric, which piece it is, how many to cut, and if it needs interfacing or not. We mark the seam allowances on the pieces around the outside, and we extend the grainlines with an arrow.


That was a different pattern piece than what I cut out of muslin in the next picture, but let's pretend it was my sleeve pattern. So now that I have my pattern piece all drawn on , I laid it down on the fabric, and I pin it down. Then I cut it with my rotary cutter (shown below) and then I transfer the necessary information onto it. 


Now that I have all of my necessary components drawn on there, I can finish cutting out my sleeves. These kind of sleeves have two parts, an upper and a lower sleeve. So now I have to stitch the two together to put my sleeves in. First I must pin them together, shown below. Always pin before you sew to ensure your pieces stay together!


And now I am going to stitch them together. Weee fun times! Some things we were taught in class: Never backstitch, always stitch in place. It adds less bulk. Then start sewing. But stop when you come to a pin, to take it out before continuing. I have learned the hard way that if you stitch over a pin you'll probably break either your needle or your pin- neither of which you should break ever lol.


This is how the jacket body looks so far. I have all of my things marked, including grainlines. 


I stitched the two sleeves together, and then I attached the sleeves in at the armholes, following my pattern pieces where they tell me to gather to ease in fullness.


And now I have a completed jacket muslin! I have a fitting coming up soon, hopefully it is up to standards! It looks pretty good to me though :) So now that this is done, after we have the fittings, we will cut into our real fashion fabric. I will keep y'all updated! It's gonna be heavy black wool with black lining and maybe a purple button to match with my purple and black plaid pants. We'll see how it goes!

Until next time,
Vivre la mode, tout le monde!

Saturday, March 2, 2013

Pants pants pants- illustration #5

Hi everyone!
Guess what we are talking about today? Surprise, we're talking about dogs. I like Yorkies and Collies and.... Kidding! We're talking about pants, as you might have guessed by my title. So because we are making pants in my tailoring class AND we have started drawing garments in my illustration class, I figured I would do a whole post devoted to them! And guess what, for women there are so many kinds, it gets confusing! Hopefully this will help. I will name some of the more popular styles, and I'll try to just stick to casual/ work wear, I won't get into athletic wear or anything. So, starting off with a bang... Pants are burficated! WHOA big word. Bifurcation means the splitting of a main body into two parts. Makes sense, most of us have two legs. When drawing pants, be sure to show the wrinkles! It makes things look much more realistic. So, I am now going to name some different kinds of pants, and hopefully this will help y'all when you are looking for your first pair of clamdiggers or maybe culottes come back in style in the future :)

*flood length means the area of leg higher than the ankle but longer than capris

Without further ado, a quick guide to women's pants!


Capris

Knickers- capri length, tied/ elastic at bottom


Clamdiggers- a little longer than Capris
Gauchos- Wide leg, *flood length* capris

Palazzo pants- floor length, wide legged pants


Culottes- wide legged, normal length capris

Cigarette pants- ankle length and slim fit
Harem- elastic at waist and ankle, very full at hips; like parachute pants

Jodhpur- full at hips, legs, and dropped crotch

 
Zouave- full in thigh and extreme dropped crotch


Dhoti- elastic waist, ankle, fullness throughout entire leg, and dropped crotch
Paper bag top trousers- normal trousers with gathered top
Trousers

Sailor pants- trousers with added front piece with decorative buttons


Whew! That was a lot! But hey, this should be really helpful to y'all "pants challenged" out there lol. I know I was before I came to this class! Hope you enjoyed :)

As always, vivre la mode tout le monde!